project #13 – Basketweave Quilt

  • Inspired by “Pastel Rails” by Becky Tillman Peterson of QuiltedTwins Blog. Free pattern, as PDF – HERE.
  • Becky offers an incredible number of other Free quilt patterns, HERE.
  • Made this one for my older brother, who requested a 60 x 84″ quilt in “manly colors”.
  • Blocks are 8″ (finished size). I used a 7×10 layout of blocks, plus 3″ wide border.
  • Change from pattern – Instead of all 2″ wide strips, mine are 3/4 to 2 1/2″ wide, some leftovers from #2 – String Spiderweb, plus many cut from new fabrics.

STARTED Nov. 10, 2019.

The backing I cut from a solid smoky blue 100% cotton Sonoma queen-sized flat sheet I got at Savers for $3.00. SCORE!  ($4.99 less 40% sale)

Made some mistakes while squaring up blocks, resulting in a few that were smaller than normal. Cut them in half and joined into a long 4″ wide strip that I ran vertically down quilt back. This was not only a fun way to use up the extra blocks, it also hid the fact that I’d had to cut a flawed area out of the sheet! (Shhh. . . this can be our little secret.)

Planned on using the same self-binding technique* as on Project #9, Denim Rails, so had to remember to put patches of the backing fabric on both ends of that pieced strip – otherwise, surprise!, two little sections of contrasting color would wrap around to the front as part of the binding. (I forgot to do this on this with the patchwork strips in project #12 – Narragansett Scraps, another reason I’m switching it from quilt back status to quilt front.)

Border – joined narrow strips of blue plaid sheet, left from #12.  Mitered Corners, which I finished by hand, and Machine-sewn Binding both went smoothly.*

Tied in traditional fashion this time, with knots on quilt front. They feel like little beads when I run my hand over surface.

Finished December 5th.

TA-DAH, my brother’s new basketweave quilt! I call it “Sand and Surf”.

Shhh, Another Secret. . .

From guild members, I’d gotten the impression that flat fold corners would be much easier than mitered ones. Since the mitered corners on project #9 proved rather fussy, I decided to try flat fold on this quilt.

I folded the first corner. Unsatisfied with the results, I mitered the remaining three and went to bed.

Had I intended to switch that first corner from folded to mitered? I can’t say. But, the next morning, in the middle of machine finishing the binding, I discovered the lone folded corner and, after pausing for just a second, kept sewing.

* NOTE to Self re: Mitered Corners with Self-Binding

For 5/8″-wide self-binding on a denim-weight quilt with NO batting. . . Lay quilt top RS up on backing, which is WS up. Trim backing so it extends 2″ beyond front all way round. Cut a triangle, measuring 2″ from point to hypotenuse, from each corner of backing. (Use paper template.) Fold the freshly cut bias edge over so the point of quilt top corner just brushes against fold. Finger press along diagonal fold to crease. Pin to hold. Repeat on other 3 corners.

Returning to the raw edge of backing, fold up 1 1/4″ and crease fold with fingernail. Run a line of pins parallel with and about 1/4″ up from fold. Slip raw edge of backing under raw edge of quilt top. Removing horizontally placed pins as you go, bring double thick edge of binding up onto quilt top and replace pins, now going vertically. Making sure there’s plenty of bobbin thread, machine-sew very close to edge of binding, all the way around quilt. Hand-sew closed the tiny diagonal opening left at each corner.

Posted in Quilts | Tagged , , , | Leave a comment

project #8 – Denim Rails 2 – with flowers

Made this fun quilt TOP in only one week during September 2019. Did the rest: backing, pin basting, tying, binding, in December.

A floral denim blouse from a local thrift store provided enough fabric for three full-sized blocks (from sleeves and back) and many patches.

Love it, love it, love it!! Made me anxious to begin Denim Rails #4! But first, I did a quilt for my brother. Photos of that coming soon.

Oh, I chose pink and white plaid from stash for the back/self-binding.

Notice – I used deep rose crochet cotton for the ties, instead of my usual light blue. I like the little pink stitches that, with all the colorful flowers, are barely noticeable on quilt front.

See Denim Rails #1 – the first, for pattern info.

Posted in Quilts | Tagged , , | Leave a comment

Two More Projects, and an Update

Obviously, it’s far easier for me to start a New project than to post about one I’ve finished. HA. Must improve on this!

Project #16:

Denim 5 – Plain with Crumbs. STARTED Jan. 1, 2020 – Creating blocks out of small scraps (crumbs) left from Denim Rails #1-3. Plan to alternate them with plain 9″ denim squares. . . Will be on the lookout for more elastic-waist jeans, which usually have no back pockets.

Project #15:

Denim Rails 4 – Black and BlueSTARTED Jan. 1, 2020 – Mixing in a few pairs of black jeans. For friend of a friend. Wants pockets in place of 9-patches along both long sides of quilt. . . to hold remotes and such.

Update on #14 – Scrappy Trips Around the World

As of Dec. 30, 2019, unfinished TOP is in limbo. . . a 4 x 6 layout of 12″ blocks is kind-of narrow (48 x 72″). Bu,t I don’t have enough appropriately colored squares to get up to 60 x 72″.

Also, this design is too chaotic for me. Adding 2″ wide (1 1/2″ finished) neutral sashing will both calm things down and make quilt wider, 55 1/2 x 70 1/2″, an extra-long teen throw. (no sashing on top or bottom)

Have plenty of random squares in Bright/Deep colors for cornerstones, but will be on the lookout for small pink, turquoise, blue or green prints with neutral background to complete sashing.

Posted in Quilts | Tagged , | Leave a comment

My Newest Project – #14 – Scrappy Trips Around the World

A fellow guild member gave me a bag, about a gallon’s worth?, of 2 1/2″ square scraps. Think of the variety of “new” fabric prints with which to play; think of the cutting time saved!

I’ve chosen Bonnie Hunter’s free Scrappy Trips pattern, essentially, 36-patch blocks, each constructed of matching squares laid in diagonal lines. Neat thing, I only need 1* to 6 squares of any particular fabric print.

My only rules. . . 1. Six matching near-white squares run corner to corner in each block, and 2. Each block must contain pink, purple or blue.

As I’m using individual squares instead of strip sets, I’ll probably be working on this one for a good long while.

NOTE: Same blocks, but different layout, make up Bonnie’s Incredible Scrappy Bargello.

* Every block provides two corner spots for one-of-a-kind squares. . . No patch shall be left behind!

P.S. There will be no Trippy photos until quilt is done. However. . . photos of quilts #7, 8 and 13 are coming soon.

Wishing Happy Holidays for Everyone!


Posted in Quilts | Tagged | Leave a comment

Project #9 – Denim Rails (#3) – with Pockets

  • Denim Rails pattern in Bonnie Hunter’s BOOK: “Scraps and Shirttails”.
  • Calls for 3 1/2″ wide denim strips, cut vertically from the legs of old jeans!
  • First Denim Rails quilt that I’ve finished, out of three begun in Aug./Sept. 2019. Mine are all smaller than the pattern, throw size: 54 x 72″. Blocks are 9″, finished.

I substituted jean pockets for the pattern’s 9-patches. Often, there’s very little fabric above and to the sides of salvaged back pockets. Easy enough to add strips of denim, usually used a different shade of blue than the pocket.

  • Making the top took only 3 days because I used several finished blocks and denim pieces left after making Denim Rails #1 and 2 tops.
  • Assembled the rows/columns of blocks at September’s Open-Sew Saturday, the first I attended, as a brand new quilt guild member.
  • Thought I was going to use a flannel sheet in place of batting, but Guild members convinced me that a blue jean quilt will be warm enough w/o any filling.
  • For the back, I chose a very LARGE-scale plaid fabric, that’s been in my stash since 2006! I know this because a dated cutting slip was still pinned to the selvedge. . . I paid $1 per yard. 🙂

First time to try self-binding*. Thought the red, pink, white and yellow of plaid would look gaudy against the mellow denim blues. But, thanks to graph paper, I was able to figure out how to cut up the plaid and rotate parts so binding contains only darker colors. I love the subtle effect this creates.

Mitered corners, another first, turned out fine. Hand-sewed the resulting diagonal mini seam on each corner.

When I laid the plaid backing out on kitchen floor, discovered it was printed slightly off-grain. The stripes of color running along perimeter of quilt are wide enough this isn’t noticeable there, but the narrower vertical stripes in the strip I inserted are definitely slanting to the left. sigh. (Thankfully, the friend I made it for has NOT noticed this. Neither did I draw her attention to it. lol)

Tied from the back, so knots and tails wouldn’t litter the quilt’s front. Inquired at Guild meeting, but didn’t find anyone who could advise best way to do this. I pin basted with bent safety pins (my first time). Then flipped quilt front/back, front/back as I went through both layers with a double strand of blue #10 weight crochet cotton, using surgeon’s knots. Did four ties per rail block and hid ties under four corners of each pocket.

Quilt DONE Mid-November 2019

Friend fell in love at first sight; I’m sure it was the 24 jean pockets that did it! She intends to display on sofa in family room, so isn’t bothered by the additional weight. But, in the future, I think I’ll limit myself to 6 or 8 pockets, unless someone specifically asks for more.

Overall, I’m pleased. Learned so much from this quilt. Feel good about how I dealt with it’s many challenges.

  • Photographed while pinned to design wall in entry way. Covered edge of quilt-in-progress, to its right, with strip of white flannel cut from a sheet.
  • Lighting – around 3 p.m. Sunlight from open door on left + open window shades + dining room chandelier + little desk lamp aimed at upper right corner of quilt.
  • DH performed his usual editing magic to correct colors and even out contrast.

* NOTES on Self-Binding:

Trim backing so extends 2″ beyond front all round. Finger press fold 1 1/4″ from edge, then tucked raw edge beneath quilt top. (This creates a double layer of fabric on outer edge of quilt.) When binding is folded over, 3/4″ wide strip of backing fabric shows on quilt front. Pin, machine stitch close to edge.

Posted in Quilts | Tagged , , , | 5 Comments

Linda’s Eternal Sewing Project List – Mostly Quilts

Thought this would be a good place to keep my project notes (Just how wide did I cut that binding?) and photos (Oh, I’d forgotten how pretty this one came out!) because a Blog is alot harder to misplace than a notebook. lol

I’ll keep the name “alottastitches”, just expanding to include sewing stitches along with crochet and knit.

For those who wonder. . . Yes, I still crochet blankets for foster children. Could do it in my sleep! Making ripple after ripple, with a few granny squares and knitted blankets thrown in. Playing with colors is still the best part. That holds true for quilts as well.

_ _ _ _ _ _ _ _ _ _ _ _ _ _ _ _ _ _ _ _ _ _ _ _ _ _ _ _ _ _ _ _ _ _ _ _ _ _ _ _ _ _  _

Projects are numbered according to when started.

List shows each project’s current status in PINK, as STARTED / TOP / QUILT / BIND or DONE.

Will publish a post, with photos, whenever I finish something.

19. Two Denim Pillows – Crazy Patch and Logo PocketFriend asked if I could make a denim pillow featuring back jean pocket with embroidered logo. I made a practice pillow first. Both DONE in one day! Mar. 2, 2020. 

18. Denim 7 – Wedges. STARTED Feb. 2, 2020 – Using the narrow denim strips I have left after cutting 3 1/2″ wide strips, for Denim Rail quilts, from jean legs. Most are slightly wedge shaped, as generally, jean legs taper from top to bottom. Plan to alternate 9″ wedgie blocks with plain denim squares

17. Denim 6 – Fade Lines. STARTED mid-Jan. 2020 – At January’s meeting of the Quilt Guild, I was given a pile of 5″ squares cut from light blue jeans. Many have a near-white fade line where crease ran down center-front of pant leg. Hope to create some kind of low contrast design, highlighting the crease lines.

16. Denim 5 – Crazy PatchSTARTED Jan. 1, 2020 – Creating blocks out of scraps (crumbs) left from Denim Rails #1-3. Plan to alternate them with plain 9″ denim squares. . . Will be on the lookout for more elastic-waist jeans, which usually have no back pockets = more fabric for large squares. Skirts and jumpers could also work! DONE Late February 2020

15. Denim Rails 4 – Black and Blue STARTED Jan. 1, 2020 – Mixing black and blue jeans. For friend of a friend. Wants pockets in place of 9-patches along both long sides. . . to hold remotes and such. Late Jan. – Changed his mind – no pockets. DONE Late February 2020

14. Scrappy Trips Around the World – A fellow guild member gave me a bag, about a gallon’s worth, of 2 1/2″ scrap squares. Using Bonnie Hunter’s free Scrappy Trips pattern, only need 1* to 6 squares of any particular fabric print. My only rules. . . 1. Six matching near-white squares run corner to corner in each block, and 2. Each block must contain pink, purple or blue. STARTED Mid-Dec. 2019 – As of 1/2/20, unfinished TOP is in limbo. . .4 x 6 layout of 12″ blocks (48 x 72″) is kind-of narrow (48 x 72″). But I don’t have enough appropriately colored squares to get up to 60 x 72″. Also, design is too chaotic looking for me. So, adding 2″ wide (1 1/2 finished) neutral sashing to calm things down and make wider. With sashing (none on top or bottom) will be 55 1/2 x 79 1/2″. . . an extra-long teen throw. On the lookout for small pink, turquoise, blue or green prints with neutral background to complete sashing. Have plenty of random squares in Bright/Deep colors to use for cornerstones.

13. Sand and Surf Basketweavefor my brotherSTARTED Nov. 10, 2019 with strips left after making #2, String Spiderweb. DONE Dec. 5, 2019

12. Narragansett Scraps – intended as the back of #11, but decided it looked so good, it should become a quilt. TOP Oct. 2019

11. Penny Patchvariation (original seen in Quilt-Along at Stitched in Color BLOG) – began with parts left after making #4, N. Blues – STARTED Sept. 2019. TOP Oct. 11, 2019.

10. Market Bags 1-3 Quilt Guild community project for nearby food banks – STARTED Sept. 25. DONE Sept. 26, 2019 – Handed in immediately, so No Photos.

9. Denim Rails 3, with Pockets – used parts left after making Denim Rails 1 and 2, with jean pockets in place of 9-patches – STARTED assembly at 1st Guild Open-Sew, Sept. 2019. TOP (only took 3 days!) Sept. 2019 /DONE Mid-Nov. 2019

8. Denim Rails 2, with Flowers TOP (took one week) Sept. 2019, DONE Dec. 2019

7. Denim Rails 1, the first in a series – TOP (one week) August 2019, DONE Dec. 2019

6. Dresden ImprovSTARTED July 2019 /

5. Xing! (in Bonnie Hunter’s BOOK: String Frenzy”, link in #1) – STARTED July 2019

4. Narragansett Blues (pattern in Bonnie Hunter’s BOOK: “More Leaders & Enders”) – STARTED July 2019 / (began assembly during initial visit to Sr. Center quilting group) / Stopped when reached (ENTER DIMENSIONS HERE). TOP Oct. 10 / Leftover parts used in #11 and 12

3. Moth in the Window (pattern in Bonnie Hunter’s BOOK: “Addicted to Scraps”) – STARTED July 2019

2. String Spiderweb – (just one of the many FREE quilt patterns in Bonnie’s blog.) STARTED July 2019, mix of calicoes and fabric from thrifty men’s shirts / TOP Sept. 2019

1. THREE Punkin Patch Wallhangings – STARTED in June of 2019 / 3 TOPS July 2019. . . (Can buy the quilt pattern HERE.  It’s also in Bonnie Hunter’s book, “String Frenzy”. Preview all 12 quilts in book, HERE)

Posted in Quilts | Tagged | 2 Comments

Crochet Corner – or – Weaving Central?

Weaving on CDs was such a big hit at the craft gallery demo this spring, I had to share the idea with the Crochet Corner ladies!

I was especially pleased to see 98 year-old M enjoying this little project

as she usually sticks with simply rolling balls of yarn. Here she unravels a sportweight cashmere sweater that I found at a thrift.

A few of the ladies have been weaving on a little larger diameter of circular loom, which I create from plastic picnic plates, by cutting an odd number of slits around the rim.

We use wooden weaving “needles” that I made from tongue depressors. After a little sanding, they work very well!

763-cc-wdn-ndles

This is the sample I briefly showed to give the ladies some idea of what they could expect of their lowly plastic plate looms.

I had thought, being made of plastic plates and acrylic yarns, these weavings could decorate the patio area right outside the Rec Room but the ladies seem to consider them too precious to be exposed to a harsh New England winter. – smile –

Here’s B’s work-in-progress.

She’d like to add some beads. I’ll dig around at home but I think all I have are pony, Perler, and tiny seed beads. I’m hoping Sal’s will come to my rescue.

M3 is about to begin her first mug rug.

While almost everyone has at least given weaving on the floor loom a try, only S is sticking with it. Progress is slow as each step in the weaving process takes deliberate thought and leg muscles soon grow tired of operating the loom’s treadles. To sneakily speed things along I add a black stripe at the end of each session.

I took this photo back when the weaving had just reached 36″ in length, a milestone. Yay!

We’re nearing the end now. While S seems content with the idea of it decorating the patio fence, Ellen keeps talking about where in the Rec Room it might hang, again reflecting the notion that handweavings are too precious to go outdoors. – smile –

It’s been so long, I’ve forgotten what length of warp I put on the loom and that satin measuring ribbon got wound around the front beam along with the woven cloth months ago. – lol – Maybe there will be enough fabric to make banners for both fence and Rec Room!

Posted in Crochet Corner, Weaving | Tagged , , , | 2 Comments

Three $3.00 Bags

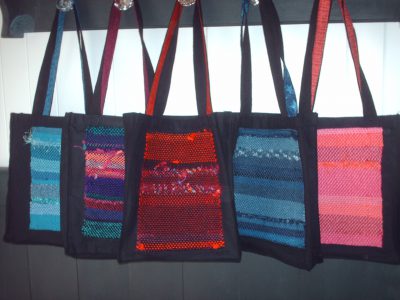
It’s far from obvious in this photo but, I actually included at least two novelty yarns in each tote’s handwoven panel.

761 totes-1-4

Doing this project made me view the two very large baskets of novelty yarns that I stumbled upon in front of a very tiny yarn shop in a much more favorable light. Well, this project AND the yarns’ price. . . fill a gallon-sized Ziploc for $3.00!

FYI: three gallons = 42 skeins and balls! (for yarn details see “sidewalk sale” in my Ravelry stash)

I couldn’t figure out why I alone was digging through those baskets! A couple of women paused, but only long enough to fondle a ball or two before walking away. Where did they find the willpower? Granted there were only one or two balls / skeins of many of the yarns but, at that price, So What!?! (the math. . . $9.00 ÷ 42 = 21¢ per ball/skein!!)

I almost stopped after filling the first bag but then I thought, “When will I ever have this kind of opportunity again?!”, and filled two more.

This, as we all know, is the kind of thinking that results in SABLE. lol

BTW – I flattened the few cardboard cores so they’d take up less room.

And then squeezed out some air, so I could get the bags zipped. lol

Posted in Thrifty Treasures, Weaving, Yarn Stash | Tagged | 2 Comments

Revisiting an Old Idea

A few years ago I wrote about this tote bag,

473 tote in woods

I up-cycled a thrifty find by covering its’ large logo with a handwoven “rag” panel.

At the time I thought, “What a good project for a beginning weaver!”, as even a first sampler can embellish a small tote. But I never pursued the idea because sewing the handwoven fabric on by machine would not be easy for a novice and hand sewing??,  well, ugh. . . so much for a quick, fun project!

Now that I’m teaching at the Artisan Soul Gallery I am reconsidering this project idea. If I can’t figure out a way to simplify things enough for a beginning weaver, I’ll just embellish the totes myself. They would make great gifts for foster children, especially when filled with a few fun treats!

I bought two dozen black cotton totes and started to play, pulling fabrics from my quilting stash that coordinate with my scrappy handwoven panels.

Note to Self: Choosing a fabric first and weaving a panel to match would be much easier!

First I tried lining the shoulder straps on a tote. Easy-peasy and I enjoy seeing the look of surprise when people notice the colorful strips.

Next I sewed a pocket inside, like on the red tote. I had to make the pocket small so the stitching on the outside of the bag will be covered by the woven panel.

473 tote pocket

Boy, I’d forgotten how difficult/frustrating sewing something to a finished tote could be, even when using a machine with a free-arm. – sigh – I thought this step would be easier with an all-cotton tote than it had been on the red tote which is nylon? with a rather stiff rubbery-feeling lining, but no. Decided, considering the effort involved, there simply isn’t enough benefit gained from adding a cute little interior pocket.

Maybe the totes will be happy with only a handwoven panel and contrast straps?

– sigh – Nice, but. . .

they need something more.

ah ha!

How about a larger pocket on the outside? Still not the easiest thing to sew, but at least now I’ll get more bang for my buck, so to speak. A large pocket on the back is much more obvious than a little one tucked inside.

After struggling to attach a few handwoven panels – this is supposed to be fun?! – I set my brain on “ponder” for a couple of days.

Would the heat required to melt fusible webbing also melt the acrylic and polyester yarns in my weaving? There was only one way to find out. . .

I’m sure other brands of iron and fusible would differ but, I got the best results when I set my iron at the low edge of its’ wool setting, spritzed the front of the tote with water and used a WET pressing cloth.

The upper right-hand corner is curled up on the bright blue one because I wanted to find out how much force it would take to pull off a fused weaving. The answer is LOTS! – lol. – This will not happen accidentally.

Here’s my second set of five, with fused panels. Let’s call them totes #6 – 10:

The cream and khaki totes, #s 6 & 9, I found at Savers, like-new – $1.00 each.

Took these first ten to Fiber Night to show Laura.

The one with purple roses, #7, now lives with Laura’s teen daughter. lol

Having shared my story of frustration over the little interior pockets, Laura gave me a very good idea. . . sew down only the interior pocket’s upper edge, so it hangs down like a pouch. And I can hide the machine stitching in the seam, where the band at the top edge of the tote meets the body.

Next I’m going to try fusing a handwoven panel to the front of a rubbery-lined nylon tote, like that old red one. I have three thrifty ones to experiment on. . .

Difficult to decide which to do first, as I know it may be ruined in the process.

Posted in Bags, Sewing, Weaving | Tagged | 4 Comments

Tees for Potholders

Although several people around the nursing home have said they’d bring in some old tees for the ladies’ weaving projects, only Ellen, the recreation director, has actually delivered. Soooo. . . I continue to shop for cheap tees at Sal’s.

Fellow volunteer, Ann, drops by once in awhile to help bind off potholders.

Currently weaving a couple of black and silver-grey potholders for the cashier at Sal’s. She’s anxious to see what we make with the dozens of t-shirts that I buy there!

Mostly I get 29¢ tees,

hoping to find those with very little advertising.

Since it only takes a few tie-dyed loops to jazz up an entire potholder

I’ll pay up to 49¢ for tie-dyed tees, even in little kids’ sizes. Woo-hoo. . . I’m such a Big Spender!! lol.

I don’t often find garments other than tees priced that low but Sal’s has been slowly lowering prices on their few remaining summer garments. I can’t wait to see what cute potholders we’ll make from this 49¢ XL flowered knit top!

It’s worth taking the time to look through the rack of men’s long-sleeved tees too.

Yeah, there’s a huge ad on the front, but the XL-sized back is clear, plus there’s all that extra fabric in the long sleeves – and all for only 29¢. ha

More tees means more weaving fun to come for m’ladies. Yay!

Note to Self: Must Remember – cut strips from that flowered top vertically, rather than horizontally, so when stretched on the loom they will curl toward the fabric’s wrong-side, letting us see the pretty print. Strips cut horizontally curl in the opposite direction, which usually works out well as the unfaded inside of a used tee often looks much better than the outside.

Posted in Thrifty Treasures | Tagged , | Leave a comment